Few pay attention to properly working plumbing fixtures. They are perceived as an integral part of a comfortable intra-home environment. When symptoms of breakdown appear: incomprehensible sounds, problems in operation or, worst of all, leaks, the equipment must be carefully inspected and repaired.
Experienced plumbers know how to eliminate leakage in the toilet. We will share their professional secrets.
How is the toilet arranged?
There are many varieties of this plumbing fixture. There are suspended and floor structures. The first ones are fixed on a special installation hidden in the wall. The second ones are installed on the floor. Regardless of this, each toilet has three main elements.
The biggest structural element is bowl. Usually it has the shape of a vessel of the same name, for which it got its name. The open part of the part gradually goes into a siphon. This is the name of a curved channel, which in working condition is filled with water.
Its diameter and the shape of the bend are calculated in such a way as to freely pass the required number of drains. A water seal forms in the siphon, which protects the room from an unpleasant odor.

Structurally, the toilet bowls can significantly differ from each other, but the basic elements are necessarily present
The tank in which the water intended for flushing is placed is called drain tank. It can have a different design and type of eyeliner. It is made most often from ceramics, but can be plastic or metal.
The main elements of the tank can be considered drain valves, filling valve, drain and overflow mechanism. The drain mechanism is activated by pressing a button or a lever, it depends on the tank model.
Image Gallery
Photo from
Flushing cistern - functional water tank
Seal around the drain hole
Seal at water connection
Spoiled float mechanism
Parts designed to provide maximum comfort when using the toilet are: seat and cover. Most often it is made of various plastics, there are models made of wood or soft options covered with foam. You can also find functional seats. They include, for example, bidet nozzles.
Types of leaks and how to eliminate them
Water on the bathroom floor is a very unpleasant surprise. Its appearance most often provokes a leak in the toilet. It is possible that this is only the initial symptom of the destructive process, so the first thing to do is to shut off the water supply.
Otherwise, there is a risk that the damaged communications will not withstand the pressure of the liquid and then the consequences of the breakdown will be much worse.

In a “put on a toilet” toilet bowl, sooner or later a leak appears from the junction between the toilet outlet and the sewer pipe
After this, you can begin to search for the leakage site and eliminate the malfunction. Some of the most common causes of leaks include:
Cracking putty at the junction with the sewer
This can only happen with toilets installed on a concrete mortar. Some people prefer this installation method. In this case, the plumbing fixture is placed directly on the solution, and the toilet outlet is also sealed with it.
This is a fairly simple and reliable installation method, however, it does not allow for subsequent dismantling of equipment, its repair is also somewhat complicated.
The leak in this case arises due to the fact that over time, the solution with which the release is sealed begins to crack a little. Scattered residues accumulate under the bell. In the process of washing them fills and partially carries away the liquid. So a leak gradually appears.
To eliminate it, you need to remove the old putty and put a new one. Some are sure that it will be quite enough to seal the cracked solution with a new composition.
Practice shows that this is a futile event, since the flow will resume soon enough. To get rid of it for a long time, they take a screwdriver and very carefully remove the remains of the old solution from the socket.
The procedure is carried out carefully and carefully. Excessive efforts are best avoided; the bell can easily crack. Then a new joint is made using sealant or cement mortar. In the latter case, it is not recommended to add sand to the composition. So the connection will last longer.
Repair work in case of cracking of the old putty is carried out as follows:
Image Gallery
Photo from
Step 1: Cleaning the sewer outlet
Step 2: Install the rubber seal in the exhaust
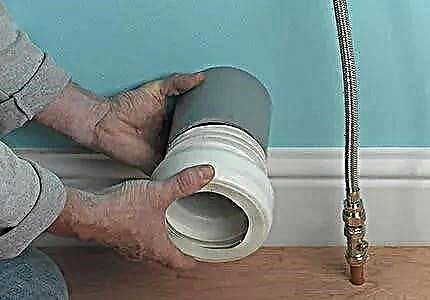
Step 3: Connect the corrugated pipe to the outlet
Step 4: Check the connection for leaks
Corrugated seals in the corrugation
If the toilet is installed on the corrugation, a leak may also appear at the junction of the outlet and the sewer pipe. The reason for its appearance is a dry seal. The membrane is made of rubber, which over time loses its elasticity and cracks.
This leads to gaps between the toilet outlet and the seal, through which water begins to leak.

Over time, the corrugation fails. If a crack appears, the part must be changed, if the joint is lost, a small repair can be done
To eliminate leaks, it is necessary to dismantle the toilet. Then remove the old seal and thoroughly clean its seat. Then you should put a new part, putting it on the sealant, and install the toilet in place.
This is the most reliable, but also quite time-consuming way to eliminate leaks. However, in some cases it is impossible to use it, since the toilet cannot be dismantled.
You can do otherwise. A screwdriver is taken and with its help the old seal is turned to the side. The resulting gap is filled with silicone sealant. If you perform the procedure carefully and carefully, the connection will be tightly sealed and will last for a long time.
Crack in sewer pipe
Another very common cause of a leak is a cracked pipe. The most correct solution in this case is to replace the worn part. It happens that for some reason this cannot be done right away, but the leak must be eliminated.
In this case, you can close the crack with an impromptu patch. To do this, you need a bicycle camera, which will act as a repair tool. The rubber chamber is cut and wound onto a damaged pipe section.

A crack in the toilet bowl is a good reason to replace a plumbing fixture without trying to fix the situation by sealing
It should be remembered that the winding is overlapped. That is, each subsequent round covered the previous one until about the middle. The rubber is wound slightly tightened so that the connection is tight enough. The last turn is pulled together by copper wire.
If it is not, you can take steel, but it is susceptible to corrosion and will serve less. In the same way, leaking joints can be repaired. As a result of the work, a reliable, but not very aesthetic connection will be obtained, which will last until the next repair.
Crack in the bowl or base of the toilet
What should I do if the toilet is flowing and the bowl is cracked? Such a device needs to be replaced. However, if for some reason this cannot be done right away, a temporary seal of the crack should be made.
You need to start by fixing the boundaries of the crack. For this, through holes are drilled at the ends of the defect. Now the crack does not "creep" further. After that, it should be well cleaned from the inside.
In order for the stripping to be of high quality, it is produced using an angle grinder. This is a prerequisite. Another tool, such as a file, will not help here.
Then, strictly according to the instructions, prepare the epoxy for work and carefully repair the crack with it. Then wait for the complete drying of the composition. As a result, plumbing equipment will lose its aesthetic appearance, but will be able to work for some more time.

In such a fairly simple and cheap way, you can permanently get rid of the problem of the appearance of copious condensate on the toilet flush cistern.
If a crack appears at the base of the toilet, it will be visually invisible. However, water from it will constantly leak to the neighbors from below. They are the first to notice the problem. In this case, no temporary measures will help. The toilet will have to be changed immediately.
Water leaking due to heavy condensation
In the cold season, a puddle on the floor can appear without leakage. Unfortunately, many do not know about this and spend time and energy in search of a leak. Everything is very simple. Very cold water enters the tank, and condensation appears on it. Moisture, accumulating, flows down and forms a puddle.
There are several ways to deal with an unpleasant phenomenon:
- Installation of a drain tank, inside of which a plastic water tank is integrated. Such equipment costs a little more than usual, but condensate never appears on it.
- Installation of the heat exchanger, passing through which the water will be slightly heated. The liquid entering the tank will not be so cold as to allow condensation to form.
- Drainage of air in the bathroom due to the arrangement of an effective forced ventilation system.
- Arrangement of thermal insulation of the drain tank. To do this, the inside of the tank is glued with a waterproof heat-insulating material.
Another way to deal with condensation is with a rag laid on the floor in the place where water usually accumulates. From time to time it will have to be squeezed, and the design of the room will not change for the better. But it is quite effective and almost free. In addition, you will have to use a rag only in the cold. In the warm season, condensation does not form on the tank. Read more about the causes of fogging the tank and how to eliminate them below.
Image Gallery
Photo from
Method 1: Thermal insulation of the flushing tank
Method 2: Enhancing room ventilation
Method 3: Air conditioning a toilet or a combined bathroom
Method 4: Install the mixing valve in the water supply
Leak on the cuff under the toilet shelf
Such problems usually arise in toilets of older models, where the tank and shelf are connected with a special rubber cuff. Over time, the rubber will dry out and crack. Water begins to leak into the cracks that have appeared.
To solve the problem, it is necessary to replace the worn cuff. This is easy enough to do. First you need to purchase a new part. In this case, it is desirable to choose the most flexible product.

In older models of toilets, a rubber cuff is located under the shelf, which dries out over time, loses elasticity and crackes
Now you can get to work. If the water supply has not yet been shut off, this must be done. Then completely empty the tank. After that, you need to find the bolts that fix the shelf on the toilet. They need to be unscrewed. The next step is to dismantle the cuff. To do this, the tank needs to be slightly pulled to the side so that it is more convenient to work. At the same time, you do not need to disconnect the flexible eyeliner.
The cuff is pulled from the seat at the outlet of the shelf, a new part is installed in its place. It needs to be rolled up, after which you can install the tank. It must be fixed in place by fixing bolts. Then the new cuff unfolds a little and pulls on the toilet.
If a leak in a new cuff is noticed during trial use, it is pulled together with wire. This must be done from the opposite side to where moisture appears.
Damage to the drain mechanism and seal
If a leak occurs at the junction of the drain hole from the tank with the toilet bowl, it means that the O-ring has worn out or the drain mechanism has broken. In order to correct the situation, the following actions are performed:
Image Gallery
Photo from
Step 1: Removing the Water Drain Mechanism
Step 2: Inspecting and Cleaning the Drain Valve
Step 3: Unscrew the drain stand
Step 4: Install New Mounting Screws
Step 5: Installing a New Drain Device
Step 6: Removing a Worn Seal
Step 7: Installing a New Rubber Ring
Step 8: Reinstall the Drain Tank
Leaking at the junction of the flushing tank and the shelf
Toilets of the compact model are very practical. Their distinguishing feature is a bowl, cast together with a shelf under the tank. The latter is mounted on it and bolted. If they are not pulled correctly or the gasket is broken, the connection will leak.
Incorrectly tightened can be considered bolts that are not fully tightened or sloped. To solve this problem, you just need to tighten them correctly.

If the fixing bolts are tightened at an angle or not to the end, the gasket will not be able to completely close the landing hole and sooner or later a leak will appear
But simply tightening the fasteners most often will not help, moreover, it can only exacerbate the problem by increasing the angle of the bolts. In the worst case, the drain tank will simply crack. It is necessary to do as follows.
First, turn off the water supply and drain all the liquid from the tank. Then, loosen the bolts so that the nuts can be loosened by hand. Then set the fasteners evenly and gently tighten. First hand, then with a wrench or pliers.
Image Gallery
Photo from
Substituting the palm of your hand under the location of the mounting screws with which the tank is screwed to the toilet shelf, we determine if there is a leak. Most often, to fix it, just tighten the nuts
Turning off the water, pour its residues into the sewer. Inside the tank we hold the fastener with a slotted screwdriver, tighten the nuts from below, applying moderate force
Fully tighten the nuts with a wrench gently, trying to give the connection a maximum seal, while not damaging the nut
After performing repair operations, open the water supply to the tank. We collect it and flush it, substituting a hand under the place of the former leak. If no longer dripping, proceed to operation
Step 1: Detect Leakage in the Anchorages Area
Step 2: Tighten the flush tank fixtures
Step 3: Tighten the fixing screws with a wrench
Step 4: Testing the result of the work done
This is the easiest repair option. It also happens that the gaskets lose their elasticity or rot the metal washers located on the mounting screws. In any case, you will need to dismantle the tank and replace worn parts.
The procedure is quite simple. First, the water supply is turned off, the flexible eyeliner is disconnected and the tank is disassembled. The cover is removed, depending on the model, this is done in different ways.
The hardest thing is with button-type products. Next, the "insides" of the tank are carefully disassembled and removed. When reaching the gaskets and fasteners, it is necessary to remove them as carefully as possible so as not to damage the equipment case.
Masters recommend that in absolutely hopeless cases, when the nuts are very stuck to the screws, use a grinder with a hacksaw blade or with a thin cutting wheel to saw fasteners.

New gaskets must be installed under the mounting bolts. Tighten fasteners neatly and correctly: they should not be tilted and not pulled
After this, you need to put a new gasket on the drain mechanism. It is placed in the tank and tightened with a plastic nut on the back side. Next, put in place the washers and rubber gaskets for the fixing screws. A rubber o-ring is put on each bolt. Then they are twisted into place.
The internal parts are alternately installed in the tank, then a flexible eyeliner is connected and a lid is mounted at the end.
Factory marriage toilet
Sometimes the question arises: why is water flowing in a new toilet? Unfortunately, in pursuit of maximum savings or due to adverse circumstances, you can buy a toilet with a factory marriage. Of course, in the store, the buyer carefully inspects the plumbing fixture and is unlikely to buy a fixture with a crack in the bowl or base. But the defect may be hidden.
For example, in the depths of the body in the area of the siphon, an inconspicuous crack or a section not filled with enamel may be located. In such cases, a leak will appear immediately after installation of the toilet bowl or shortly after the start of its use. It will be almost impossible to eliminate it. Only replacing the toilet.
Therefore, it is important to purchase the products of well-established manufacturers and carefully inspect the device before purchase.
How to permanently get rid of condensation on the toilet flush tank:
What to do when there is a leak in the toilet:
What to do if there is a leak in the drain tank:
Leaking in the toilet can occur for a variety of reasons. And in each case, you have to look for it yourself. Perhaps the search for the cause of the leak and its repair will be beyond the power of a novice plumber. Then you should seek the help of specialists.
However, if desired, almost any leak can be handled on its own. It is important to follow all instructions correctly and to act carefully and carefully.
Have questions about the topic of the article? Found bugs or is there valuable information that you can share with visitors to our site? Please leave your comments, share tips, ask questions in the block below.