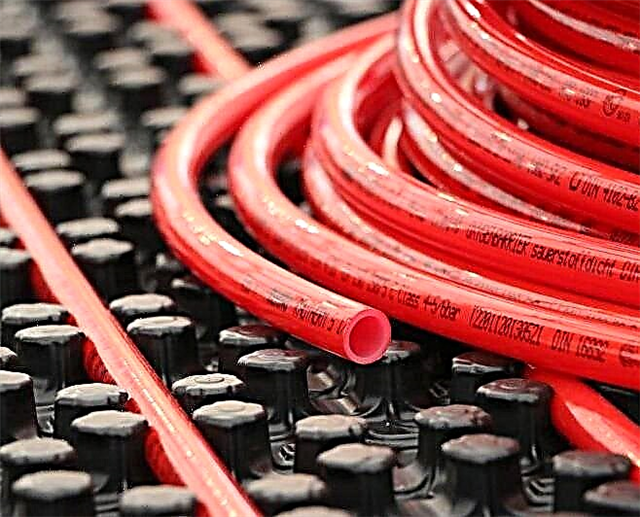
The maximum return on the heating system can be achieved by operating a complex of various heating devices. For example, if along with traditional radiators use STP (underfloor heating system) is an effective heating option, which many install independently.
In the article we proposed, it was examined in detail how to lay a warm floor under a laminate on a concrete floor. We presented common and simple solutions that are popular among practical owners. Independent home masters with us will find assembly and wiring manuals.
Advantages of the “warm floor + laminate” scheme
Warm floors are becoming more popular, as it became possible to do all the steps - from rough screed (concrete base) to the finishing decorative coating - with your own hands. If the base of the floor in the apartment is a smooth concrete coating, it is easy to install the STP.
Laminate has some advantages over other types of finishes. It is suitable for all varieties of electric and water floors, provided that for laying the elements a smooth surface without differences and protrusions will be provided.

The concrete base provides a flat surface, necessary for laying heating elements, and the laminate absorbs and transfers heat efficiently and evenly
If you focus on the combination of STP + laminate, then you need to analyze the installation conditions, make preliminary calculations, and then select the materials:
- high-quality laminate, which over time does not deform due to high temperature;
- elements of a warm floor, the most suitable for specific conditions.
For example, if you live in a city model apartment, then you should immediately abandon water floors. Installation of systems connected to central communications is prohibited. However, for a private house, the heating of which is carried out from a gas boiler, this will be one of the most successful solutions.
When choosing a laminate as a topcoat, it is possible to change the interior quickly and easily.
A tired or worn-out laminate can be replaced with a softer carpet, linoleum that is easier to care for, or another type of flooring, without changing anything radically in the underfloor heating system, except for installing another layer - plywood.
What is the basis for choosing a warm floor system
Since the concrete base and the laminate provide maximum freedom in the choice of STP, we will consider all possible options. Depending on the choice of energy source for powering the heating elements of the system, there are two large categories of TP: water and electric.
Water bodies are mounted both on the concrete floor and on the floor. The flooring is wooden and polystyrene, but we will only consider a system with a cement screed. Electric is most often divided into three types, but there are other classifications, more detailed.

The main types of STP powered by electricity include rod, cable and film types. They combine perfectly with the laminate, but in some cases installation of an additional leveling layer (for example, plywood) is required
When choosing one or another type, they rely on the characteristics of systems and personal preferences. Cost also plays an important role, so preliminary calculations should be made. Suppose film STPs are expensive, but they are often placed directly under the topcoat, which reduces the total cost of materials to create a multi-layer “pie”.
Consider the different types of systems in order to understand the fundamental difference between them.
Image Gallery
Photo from
The most popular type of water system is when pipes with a coolant are literally sewn on both sides with a sealed cement mortar coating. It is important to test the system and make sure that it works flawlessly before filling the final screed
Plates of extruded polystyrene foam with tongue-and-groove locks, which allow creating a stable and reliable coating, serve as elements for the flooring device. Their advantage is that they create additional thermal insulation
There are two versions of the device flooring made of wood: modular and rack. In the first case, grooves for the cable are cut out in thick boards or boards, in the second case, the lines with the coolant are laid between the rails. Top covered with thin metal plates
The power cable is laid according to various schemes, among which the most popular are "snake" and "spiral". The advantage of cable systems is that they are mounted on an uneven surface, and an ideal base for the laminate is created with a finishing screed
Thermomats are easier to install, as the power cable is already attached to a thin substrate. In the process, just roll the rolls carefully. But unlike a system from an ordinary cable, the thermomats have the same pitch, so the power in different areas cannot be adjusted
A feature of the self-regulating cable is its ability to react sensitively to changes in room temperature and create comfortable conditions over the entire area or individual sections. Disadvantages - high cost and short life
This is the thinnest type of STP - only 0.4 mm in thickness. Most often, it is mounted between the layers of the leveling substrate and the heat-reflecting film. Due to the stability and rigidity of the laminate, an intermediate plywood layer is not required
Thin rods half a centimeter thick are characterized by high efficiency, but require a perfectly flat base. Before laying the laminate, they are poured with a traditional screed or self-leveling mortar of the bulk floor
Water floor with concrete screed
Water floor with polystyrene flooring
Water floor with wooden flooring
Screed electric cable floor
Thin Cable Thermometers
Self-adjusting cable tie
Film and / to a floor under a decorative covering
Carbon Rod Modules
Considering the cost of the material, the conditions of installation and the performance of the systems, three options are recognized as the best for installation under a laminate: a water floor in a screed, a film floor for a finish coating and a heating electric cable, also walled in a screed.
Instructions for arranging water STP
For individual housing, a water system is preferred. It allows you to save electricity and use the same coolant that enters the radiators for floor heating. Of course, they are constructed according to the collector scheme, in which the floor in each room receives a coolant of almost equal temperature.

Connection diagram STP. In addition to the heating circuit, for the device of which pipe material made of cross-linked PE-X polyethylene is usually used, a set of equipment for adjustment is required
Assume that the rough concrete floor is ready, and it is necessary to mount the STP in a separate room. At the same time, it must be embedded in the finished coolant supply system, to ensure the possibility of quick shutdown.
Image Gallery
Photo from
If there is no finished tape, you can cut foil isofol into pieces 15 cm wide. Thickness - not less than 5 mm. The tape is glued to the very bottom of the wall, leaving no gaps between the individual pieces
Insulation prevents heat from entering downward. An advantage of roll insulation is a marking grid that allows cable laying at intervals of the required width. The joints of the foil coating are closed and fixed with tape
To fix the water pipes and level them over the entire area, a reinforcing mesh of thin wire is laid. Separate fragments are fastened together by pieces of wire. The standard size of one cell is 10 cm
A polyethylene pipe is connected to the outlet in the heating radiator using an adapter. A plastic flexible corrugation is put on the end of the pipe. Sealing rings are provided by O-rings and union nut.
To lay the pipe according to a given pattern and ensure stability, it is fixed on the grid with plastic clamps. To form smooth bends of the “snake”, polyethylene is heated with a building or household hairdryer
It is necessary to install a circulation pump for quick heating of the system and a shut-off valve so that it can be turned off if necessary
Lighthouses are necessary to ensure uniform distribution of the mortar and, as a result, uniform floor heating. The height of the screed over the pipes should not be less than 30 mm. To provide the desired height, it is enough to put pieces of paving slabs under the beacons
A thick layer of thick cement slurry is applied over the entire area to completely close the pipes. It is necessary to fill all the voids, and then level the surface with a rule, removing excess solution. Drying time - 28 days.
Step 1 - Install Damper Tape
Step 2 - laying the foam insulation
Step 3 - installation of reinforcing metal mesh
Step 4 - connecting the PE pipe to the heating system
Step 5 - Attaching the Pipe to the Mesh
Step 6 - installation of equipment for regulating the flow of coolant
Step 7 - Install Metal Beacons
Step 8 - laying the screed on the pipes
To prepare a cement mortar, which will be screed screed, use either ready-made or home-made mixture. Ideal is concrete grade M300.
Proper preparation of the solution, according to the instructions, eliminates drying out and the possible appearance of cracks and voids. If the surface of the screed is not perfectly smooth, after drying it is possible to fill in a layer of self-leveling mixture with a thickness of 3-5 mm.
How to make an electric heated floor?
It is recommended to equip electric floors for citizens who prefer to use a combined heating system. A centralized network does not always live up to the expectations of apartment residents in multi-storey buildings.
But the additional effective heating helps to survive the cold or create a comfortable environment in children's rooms or in other rooms in which the laminate is laid.

Option to connect the cable system to the thermostat and the circuit breaker. To create a circuit, you can use one or more cables by wiring in the junction box
We recommend using proven turnkey systems. Their characteristics are tested by the manufacturer, so you do not need to make complex calculations, just select the model according to the specific requirements of the power or heating area. As an example of installation, we offer photo instructions for installing STP with a two-wire cable of the Electrolux brand.
Image Gallery
Photo from
You will need tools for priming the floor, shredding the wall, preparing wires for the connection. Roulette and a marker are also necessary for marking the installation of the thermostat and calculating the length of the contours
In the wall, it is necessary to cut a hole for mounting the thermostat and a groove for cables - the power line and the temperature sensor wire. The dimensions of the groove are 20 * 20 mm. To cut the recess, use a drill with a nozzle, the groove is made with a circular
Debris that has appeared as a result of breaking the wall must be removed. Then you need to sweep and wash the concrete base to cover it with a primer. The soil will provide adhesion of the concrete surface to the cement screed
Thermal insulation is needed if the floor below is an unheated room, such as a basement. Sheets of heat-insulating material are connected with aluminum tape. To make the cable easier to install, mount the mounting tape with notches
When laying the "snake", consider the installation requirements: the distance to the walls is 50 mm, to other heating appliances - 100 mm, the pitch between the lines is at least 80 mm. It is forbidden to bend the cable on bends, and also to pull with force
The sensor is carefully inserted into a plastic flexible tube. One end of the tube is tightly closed with a plug, the second through the groove on the wall lead to the installation site of the thermostat. The length from the wall to the installation location of the sensor is not more than 60 cm
Testing the system for performance can be done before or after installing the thermostat. The device is mounted according to the instructions, connecting the wires to the designated terminals. Thermostats of different models differ in the nuances of installation
To ensure that the surface is flat, put lighthouses. The thickness of the screed is 4-5 cm. The final coating can be installed after 7 days, and the floor heating can only be used after 4 weeks, when the screed is completely dry
Step 1 - tool for mounting STP
Step 2 - preparing the site for fixing the temperature controller
Step 3 - cleaning and priming the concrete base
Step 4 - laying the thermal insulation layer and mounting tape
Step 5 - installation of heating circuits
Step 6 - Installing the Temperature Sensor
Step 7 - wall mounting the thermostat
Step 8 - pouring the cable tie
In addition to the simplest temperature controllers with mechanical control, there are programmable models that are most convenient for use in everyday life. By pressing a pair of buttons, you can adjust the heating of the room by time of day or even by certain hours. Thus, significant energy savings occur.
The installation procedure of the film system
If we talk about self-assembly, the film floor has two significant advantages: it takes very little time to install it (experienced builders can do it in 1 hour), the laminate is laid directly on the heating elements, bypassing the leveling layer.
If a soft carpet or linoleum is used as a decorative finishing coating, then an evening layer of plywood will be required.

The connection scheme of the SPTP is quite simple: each module is connected by a pair of wires to a thermostat, which, in turn, is connected to a power line
Typically, a reflective material that serves as a substrate is laid directly onto a concrete base. In the presented photo instruction, concrete is covered with plywood, as the floor is not too smooth. Instead of plywood, you can use a self-leveling screed - the laying technology does not change from this.
Image Gallery
Photo from
The film floor is selected according to power indicators and the size of the working area. Usually, zones where heavy furniture is located are not taken into account. However, there are also such systems that allow furniture to be located at a height of 30 cm without loss of functionality
Isolon plays the role of a barrier to heat, prevents its loss, directing up. Rolls are rolled so that the stripes lie strictly end-to-end, without overlap. The material is fixed to the floor with either double-sided tape or a construction stapler
It is important not to leave the slightest gaps between the fragments of the reflecting material, so the strips are glued together with a special adhesive tape. It is rolled along the joints along the entire length. Recommend to use material from one manufacturer.
Rolls of thermal film roll on the floor. If it is necessary to cut a separate piece, make a cut with scissors in the middle between two silver lines. Cut edges insulate PVC with material from STP kit
Metal clamps are required for connecting wires. They are installed according to the scheme: one side is inside, the second outside, on top of the current-carrying strip. All contacts are directed to the wall with thermostat. So that the contact clamps do not slip, they are pressed with pliers
After connecting the film strips with tape, it is necessary to connect the supply wires to the clamps. They differ in color, so you need to strictly follow the instructions, which shows the connection diagram. Joints protect with bitumen tape
The sensor is installed near the control device, fixing it with adhesive tape on the thermofilm. Power wires are pulled to the installation site of the thermostat, then the device itself is mounted. The connection diagram is in the instructions
The top layer before laying the laminate is a film. It performs several functions, but the main one is protective. The polyethylene layer protects the laminate from minor irregularities, and film heaters - from possible mechanical damage
Step 1 - verification and preparation of the STP kit
Step 2 - flooring of Isolon-type heat-reflecting material
Step 3 - gluing strips with tape
Step 4 - installation of film heating elements
Step 5 - Installing Mounting Clips
Step 6 - connecting electrical wires
Step 7 - connecting the temperature controller and temperature sensor
Step 8 - mounting the protective film
The protruding joints, which can complicate the laying of the laminate, are deepened by cutting small holes in the substrate.
In contrast to the water and even cable counterparts, the installation of a film floor is quick and easy. Using instructions and diagrams, even a beginner can cope with the connection of wires - for this reason film owners like to buy apartment systems far from the construction industry.
Laminate laying rules
Whatever STP you prefer, the laying of the finish layer of the laminate is carried out according to the same technology. There are several laying methods that depend on the type of laminate chosen.
For self-assembly, the CLICK locking system is best suited, based on a simple snap-on system.

Connection diagram of two parts. Calculate the amount of material and determine the layout of the elements should be before starting work. You also need to prepare a circular for fitting parts
The option with a film floor is considered the easiest to install and popular among urban residents, so we present it as a model for laying laminate flooring. In order to acclimatize before laying, it is necessary to withstand the material in the room where the installation will be made.
Image Gallery
Photo from
Before laying the laminate, make sure that the elements of the system are working properly and that the thermostat is connected correctly
If a laminate is chosen as a decorative material, then it is enough to cover the heating film elements with a plastic film
The first element is placed in a corner, but stepping back from the wall. As a result, the first row should lie along one wall, with a comb to it
To connect the elements in the end part, the crest of one element is inserted into the groove of the second and snap
Clearances near walls, pipes, columns are necessary so that the laminate does not swell when swelling. Wedges are used to provide crevices.
To make a strong connection, the part is placed with a comb in the groove of the already lying panel at an angle of 20º, then simply lower it to the floor
When all panels are laid on the floor, with the help of a drill, metal skirting fasteners are installed in the lower part of the walls
The last stage is the installation of a plinth around the perimeter of the room. You can use the models proposed by the manufacturer of the laminate collection, or plastic products
Step 1 - control testing of the floor heating system
Step 2 - installing a protective coating
Step 3 - start laying the laminate
Step 4 - connecting the individual parts along the end
Step 5 - arrangement of expansion joints
Step 6 - connecting the parts along the long side
Step 7 - mounting the hardware for the baseboard
If there are pipes in the room, then the deformation gaps around them must be masked with decorative elements. Usually they use plastic fittings that are suitable in color.
The most serious violation of the technology of laying panels is their rigid fastening. In the process of the slightest swelling or drying out, the firmly fixed elements are deformed, and the locks fail.
The following article will familiarize with the installation of underfloor heating on a wooden base, comprehensively considering the issues of choosing a system, designing and implementing a project.
To get a closer look at the installation process of a warm floor and learn how to avoid gross errors, we suggest watching a useful video.
Practical recommendations for installing TP under the laminate:
Tips for installing a film floor in a wooden house:
How to make a concrete base - “rough screed”:
Instructions for installing the STP, installing the thermostat and laying the laminate:
Both the installation of the STP and the laying of the laminate can be done independently. You don’t need to buy expensive tools for this, knowledge of special technologies will also not be useful.
Beginners are advised to start with a film floor, and more experienced home masters will cope with the water system. But do not forget that regardless of the selected type of STP, it is necessary to make preliminary calculations.
Want to talk about how you built a floor heating system on a concrete base with your own hands? Do you have useful information that is worth sharing with site visitors? Please write comments in the block below, ask questions on the topic of the article, publish a photo.