Using a dimmer, rarely anyone thinks about its device and the principle of operation. However, a small electronic or mechanical device of a rather simple design can significantly increase the level of comfort.
If you understand what a dimmer is and how it works, you can independently connect or even assemble a device that is useful in everyday life.
In this material we will tell you what the dimmer is and why it is needed, and also give instructions for self-installation of this device.
What is a dimmer?
The word dimmer is translated from English as "dimming", which is fully true.
A compact electronic or electronic-mechanical device is used to turn on / off and adjust the power of lighting devices. In this regard, he received another common name - dimmer.
Lighting of rooms is not the only area where dimmers are used, but it is thanks to it that they have become popular in everyday life.
It is very convenient to habitually control the lighting load with the help of a device that, in its structure and appearance, resembles a switch.

Devices that change the level of illumination in a room are designed for different types of lamps. For example, dimmers for LEDs differ from analogues for incandescent lamps
The prototype of a modern device was a rheostat, invented by the German I. Poggendorf in the century before last. The principle of operation was to adjust the voltage in the circuit with a resistance level.
The main disadvantage of the experimental setup is that in order to reduce the brightness of the lighting, it was necessary to reduce the voltage. This increased the current strength and resistance, as a result of which the device was very hot and had a reduced efficiency.
The efficiency has been increased through the use of autotransformers with stable voltage and frequency. But these are bulky, inconvenient for domestic use installations. As a result, electronic models are recognized as the best - efficient, economical, small in size.

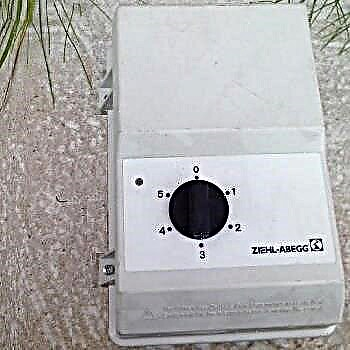
Sample single-channel dimmer with rotary control. The device is enclosed in a plastic case; the power level of LED strips is regulated by turning the handle made of aluminum
Many device users believe that a dimmer can dramatically reduce energy consumption and, accordingly, reduce the cost of paying for it.
In fact, the savings are about 15-18%, but comfort still comes to the fore.
Here are just some examples of the productive use of a dimmer:
- decrease in lighting, slight dimming in the evening to create a relaxed atmosphere in the bedroom, nursery or living room;
- the embodiment of a design painting of lighting;
- creation of lighting for suspended ceiling structures;
- operation of the lighting system in various modes.
By reducing or increasing the power of ceiling or wall lights, you can completely change the surrounding interior.

A useful feature is actively used in public and entertainment venues (theaters, bars, nightclubs) to get an unexpected, bright, colorful light effect
With the advent of electronic models, the capabilities of dimmers have increased: you can set the mode of blinking, pulsation, smooth or sharp attenuation. There are programs that recreate unusual lighting patterns only by changing the power of lighting fixtures.
Pros and cons of using
Before you purchase a dimmer, you must correctly assess the situation and decide whether it really is necessary.
Sometimes the installation of a dimmer in the house really turns out to be useful, since the device has remarkable advantages.
Image Gallery
Photo from
The main function - increasing / decreasing the brightness of the light - in itself is already interesting. You can set a “working” mode, in which every speck of dust is visible on the table, or dim the light to a minimum to give your eyes peace and relax
Electronic filling of the device allows to increase its capabilities, making control methods even more comfortable. For example, turning on / off by popping or a specific command, by sending a signal through a radio channel or Wi-Fi
Unlike step switching, the smooth one protects the circuit from sudden current surges, which contributes to the long service life of the lamps and the device itself. Using the knob, smooth adjustment is more difficult, and the touch device works ideally in this sense
If there is a risk of robbery or for some reason it is necessary to create the impression of an apartment in which someone is constantly located, install a device with the function of simulating presence. The light turns on and off in different rooms
Adjust the brightness of the light in the room
Extended range of features of modern models
Smooth change in power and brightness
Human presence simulation function
However, there are disadvantages. The main ones are related to installation work. You may need to change the wiring for installation, and then make redecoration. Some devices can disrupt sensitive devices, as they cause electromagnetic interference.
Most dimmers are not universal, that is, they operate with only one type of lamp, for example, with traditional incandescent lamps at 40 watts or 60 watts.
If you want the efficiency of the device to reach its maximum, then just the use of glow lamps should be avoided. The big return is expected from lighting devices on LED sources.
Categories of dimmers
There are various classifications of dimmers based on the method and place of their installation, design features and types of lamps that they serve.
Every year, new modifications appear that increase the lists of existing devices. Consider the types most common in domestic use.
By location and installation method
The user, far from electricians, presents the dimmer as a device that replaces a switch. This is true, but on box-mounted wall-mounted appliances, the variety of dimmers does not end there.
There are three types that differ in appearance and in the connection method and in the nuances of the adjustment functions:
- modular devices that are installed in the switchboard on a DIN rail;
- monoblock wall constructions with a rotary knob, button or other adjusting device;
- instrument (boxed) models that are inserted into the installation box and connected directly to the switch.
The first help out when the existing conditions are not suitable for installation in a switch box. Instead of several models serving different lighting circuits, a multi-channel device acting on all lines is placed in an apartment electrical panel.
But for this you need enough space on the shield, since the dimmer is usually rather big in comparison with the same circuit breakers.

A general device that regulates the operation of 2-3 circuits is ideal if the load of individual lines exceeds 230-300 W, which threatens overheating of the mounting boxes
The second type is a more “smart” switch replacement. The plastic candy bar is installed in the same way as the usual electrical installation for turning on / off the lamps. It has an integral case, and the electronic mechanism is hidden inside it.
External working elements are terminals for connecting conductors and a knob or key for control. Along with devices of a mechanical type, sensory and remote can be found.

The monoblock device is installed in a place convenient for constant use - near the doors to the living room or corridor, near the bed or sofa, designed for night rest
The third type in size is smaller than other analogues. This is a small box of rectangular or round shape, equipped with a convenient terminal block for wires.
If the room has a false wall, a drywall partition or suspended structures, then the product can be installed behind them, without the use of additional equipment - an installation box. Devices located in the reach zone are controlled from the remote control.

The dimensions of the built-in dimmer allow you to easily place it in the socket. First, a dimmer is connected and inserted into the mounting box, and then the same manipulations are repeated with the switch housing
By design features
The device of built-in devices practically does not differ, and the designs of monoblock models with external panels are usually divided according to the control method, electronic-mechanical or electronic.
Thus, the following types of devices are distinguished:
- rotary;
- rotary push;
- push (keyboard);
- sensory;
- remote.
The first category can be recognized by the round knob, which is simply turned clockwise / counterclockwise to adjust the lighting.
The second is a successful combination of two types of actions - pressing and turning. To turn on / off the lighting device, you must press the button, to decrease / increase the brightness, turn it on the axis.
Keyboard solutions externally repeat switches and can have one or two keys - depending on the number of connected lamps.

To bring the lamp into action, the key is pressed and immediately released; a delay is required to adjust the brightness, i.e., a longer press on the key
To control the touch model, you do not need to turn anything, just touch the front panel and hold until the lighting reaches the desired level.
But remote devices are recognized as the most convenient, which are controlled from a remote point using the remote control. However, the mechanical method (rotary or push) is also preserved.

A lighting network equipped with remotes and control panels is most often part of the “smart home” system, effectively “commanding” and other devices and devices
The choice of dimmers is really wide, but before you buy, do not forget: the more comfortable and functional the device is, the more expensive it will cost when buying and installing.
By type of lighting device
As mentioned above, universal models do not exist. If there are designs declared as universal, then their functioning with various types of lamps is limited.
Suppose some devices are designed for LED and energy-saving lamps, while they are designed for 12 V, others for halogen and incandescent lamps, 230 V.

An example of a simple rotary device that can control one lighting circuit. Lamps in chandeliers or lamps must be halogen or with a filament
There are several nuances that you need to clarify before buying. For example, halogen lamps for a 220 V network should not be confused with 12/24 V halogens connected via a step-down transformer.
In addition to traditional light sources - lamps - many modern LED modifications are sold, which are also connected through the transformer that comes with the kit.
Dimmer Installation Instructions
Electrical installations of the Legrand brand have long established themselves as reliable and “long-playing”, therefore, we will consider the installation procedure for a dimmer of a well-known French manufacturer.
The device can be placed in a mounting box or simply in a wall instead of a conventional switch, therefore, additional preparation of the wiring or installation location is not needed.
Image Gallery
Photo from
Unpack the device, disassemble it, if it is assembled, and get acquainted with the connection mechanism. On the front side there is a panel for attaching two keys, large and small
For convenience of connecting wires to the device, each terminal has a symbol: 1 - incoming phase, 2 - outgoing phase, B - for connecting additional electrical installations (if necessary)
The scheme is a mandatory part of the instructions. All the nuances regarding the wiring or connections indicated on the diagram must be observed. If the device is sold without instructions, most likely it is defective or fake
We remove the insulation from the ends of the cores and insert them into the terminals: white at the input, blue at the output. If it is not planned to connect other devices, the work with the terminals is considered complete. Tighten the terminal block screws
After making sure that the wires are connected correctly and hold tightly in the sockets, we insert the dimmer body into the mounting box. We twist the two fixing screws into the holes located on the sides, but do not tighten it to the end
To adjust the horizontal, use the level, applying it to the upper part of the body. You can use any suitable tool, magnetic, water or laser. Having set in the correct position, we tighten fasteners
The last stage of installation is the installation of decorative elements. First we attach and click on the frame - until it clicks, then in the same way we fix the keys. We do everything with light movements, trying not to damage the parts
We check the operation of the small and large keys one by one: they should move freely. We connect the lamp, apply current and see how the lamp reacts to manipulations
Step 1 - Introducing the Dimmer
Step 4 - connecting wires
Step 5 - Installing the Case in a Box
Step 6 - checking the horizontal position
Step 7 - setting the decorative frame and keys
Step 8 - Testing the Instrument
If you have any problems, we recommend that you turn off the machine again, carefully disassemble the switch with a dimmer and check whether the wires are correctly inserted into the terminals. If everything is in order with the device, we additionally check the connection of the lamp.
Do not forget that the connection diagrams of different devices have differences, and sometimes fundamental, so be sure to first study the instructions and diagram, and then proceed with the steps.
Also on our website there is an article where we talked in detail about how to assemble a dimmer with our own hands. More details - follow the link.
Light controllers are not a novelty in the Russian market, therefore, even more information about the device, operation and connection of devices can be obtained from the video posted on the network by experts and amateurs.
About dimmers and advantages of their use:
Useful recommendations of an experienced user to choose a device:
How the dimmer works, clearly and clearly in the video review:
To select or connect a dimmer, you do not need to study electronics in order to thoroughly understand the principle of operation. Usually, the necessary characteristics become known even with a superficial acquaintance with the model. The main thing is to choose a device suitable for the network parameters, carefully study the circuit and make installation strictly according to the instructions.
If you can supplement the material with interesting information regarding the selection or connection of dimmers, please leave your comments in the box below. Here you can ask questions or participate in a discussion on the topic of the article.